By following a few simple steps, you can access blocked information and protect your online identity on your Android device. Setting up a proxy is the solution.
Whether you’re a beginner or an experienced tech user, this tutorial will guide you through the process of how to configure a proxy server on android. Get ready to enhance your browsing experience and explore everything the Internet has to offer. Let’s start now!
How To Configure Proxy Server on Android?

On Android phones, you can set up proxy settings for Wi-Fi networks. This is useful if you’re at work or school and need to access the internet. When you set up a proxy, your web browsing will go through that proxy server.
However, not all apps will use the proxy settings you’ve set up. Each app can decide whether to use them or not. That’s why using a VPN might be a better idea.
With a VPN, all of your app’s internet traffic goes through the VPN connection. This helps hide your IP address and lets you access websites that might be blocked in your country.
Setting up proxy settings is similar on all newer Android versions, from Android 4.0 to 7.1. But keep in mind that the Settings screen might look a little different depending on your phone’s brand.
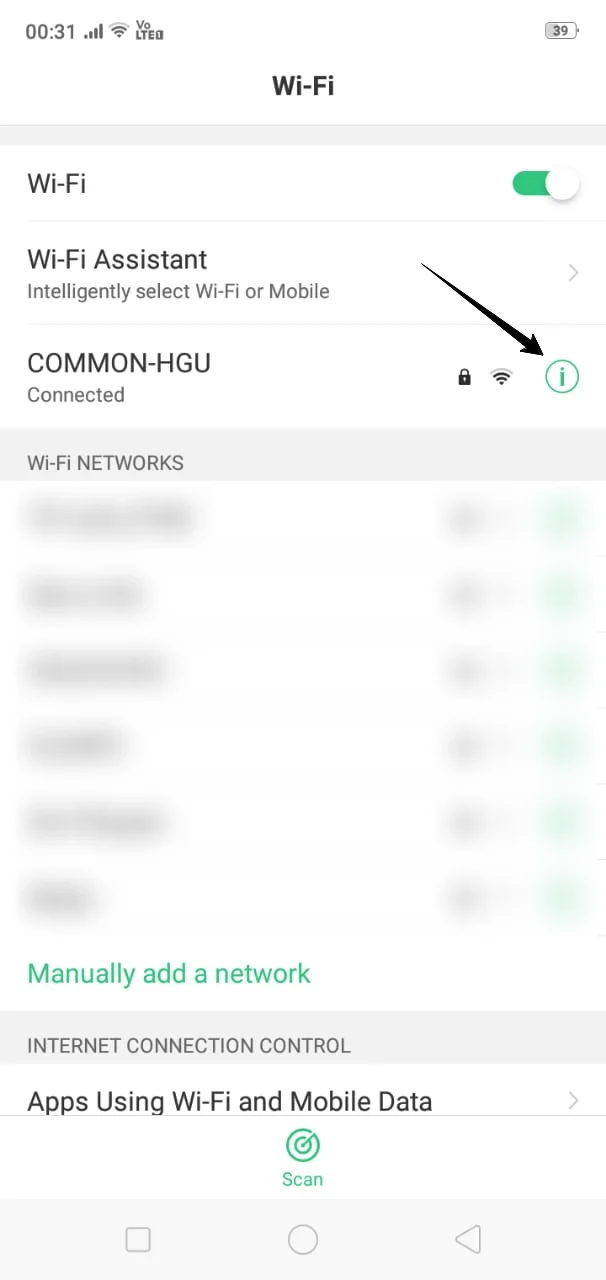
Tap “Wi-Fi” in Android’s Settings app to view Wi-Fi networks.
To change the proxy settings for a Wi-Fi network on your Android phone, do this:
- Hold down on the name of the Wi-Fi network you want to change.
- A menu will pop up. Tap on “Modify Network.”
- If you haven’t connected to the Wi-Fi network yet, you’ll need to do that first and enter the password.
- Then you can access the options to change the network settings.
To make further changes, follow these steps:
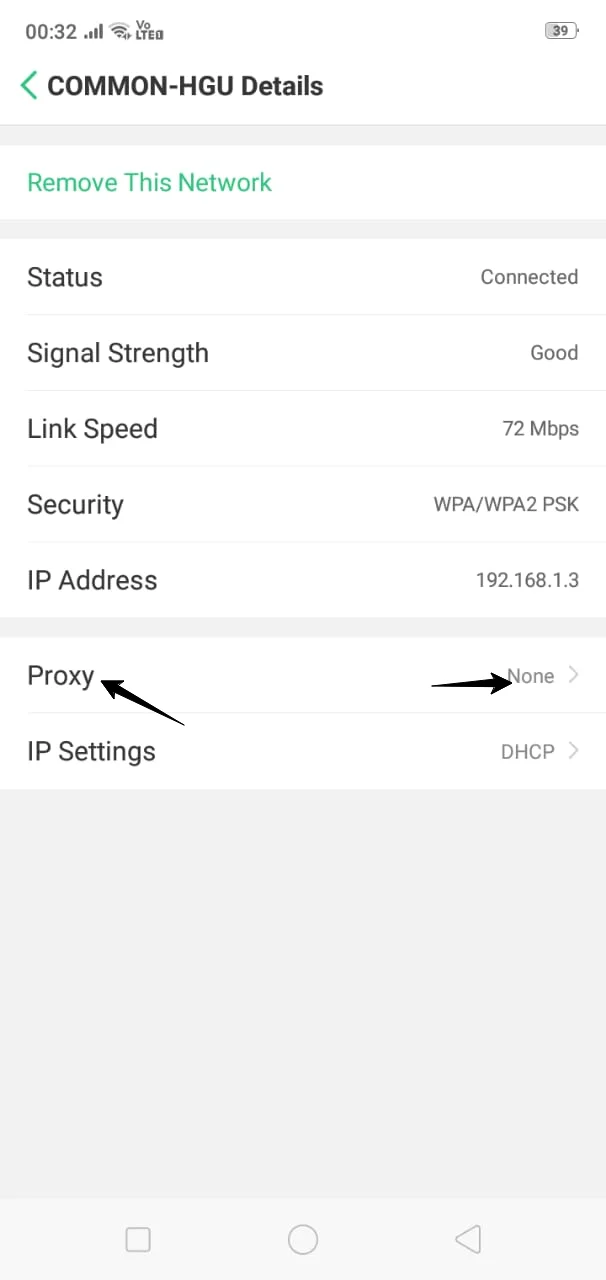
- Expand the “Advanced options” part on the screen.

- Tap on the “Proxy” option.

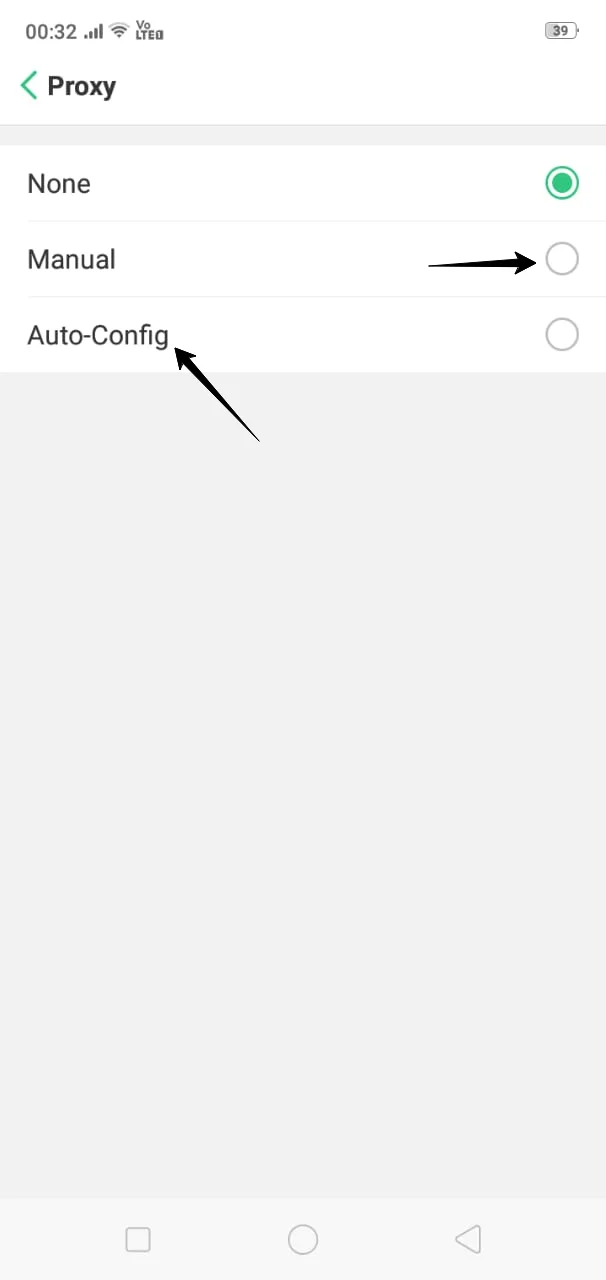
- You’ll see three choices:

- “None” means you’re not using a proxy.
- “Manual” lets you enter proxy server details manually.
- “Proxy Auto-Config” automatically finds the right settings for your network. Note: This option might not be available on older Android versions.
In the “Proxy Auto-Config” option, Android asks you to enter the address of a proxy auto-configuration script, called a PAC file. You’ll get this address from your network administrator or proxy service provider if needed.
Unlike other systems like Windows, macOS, iOS, and Chrome OS, Android doesn’t support WPAD (Web Proxy Auto-discovery Protocol).
This is a way some networks automatically send proxy settings to devices. So, if you turn on “Proxy Auto-Config” on Android, nothing will happen unless you also provide the address of a .PAC file where Android can find the proxy settings.
If your network uses WPAD, you’ll either have to give Android the right auto proxy config script or manually type in proxy server details.
You can manually enter the proxy server details if you choose “Manual.” The proxy server address should be entered in the “Proxy hostname” box.
This could be a website name like “proxy.example.com” or a series of numbers like “192.168.1.100.” Just use whatever you have. Then, in the “Proxy port” box, type the port number that the proxy needs.
If there are specific websites you don’t want to go through the proxy, you can list them in the “Bypass proxy for” box. Just separate each website name with a comma.
For example, if you don’t want the proxy to be used for “https://www.twinstrata.com/,” you’d type it like this: https://www.twinstrata.com/
When you’re finished, tap “Save” to keep your settings.
Each Wi-Fi network you connect to can have its own proxy server settings. So, if you set up a proxy server for one Wi-Fi network, it won’t automatically apply to other Wi-Fi networks you connect to.
If you need to change the proxy server settings for a different Wi-Fi network, you’ll have to go through the same steps again.
Quick Links:
Conclusion
Congratulations! You’ve successfully set up a proxy on your Android phone, giving you access to unlimited content while keeping your online privacy protected.
Now you can browse the Internet smoothly and explore all it has to offer without restrictions. Remember to use this capability responsibly and stay informed about current Internet laws.
Enjoy your newfound freedom and make the most of the endless possibilities available to you as you continue your online journey.
