This article is all about how to fix ‘err_name_not_resolved’ in Windows.
The most irritating moment is when our web pages are denied loading and start showing random errors. One such error is err_name_not_resolved. If your browser is also causing problems and showing Err Name Not Resolved error, you badly need to go through this article.
Such error occurs due to the DNS servers blocking some or all websites from getting access or for some similar reason. Although this is a serious problem, it has a simple workaround. I won’t commit it to be just a one-click method, but it surely has an easy solution.
Since this problem can occur for various reasons, one solution can not be a suitable fit. If you know the problem for this error to take place, you can resolve the error easily. But if you don’t know why this issue has occurred, probably you will have to try different methods.
Below is the guide, we have provided all the possible solutions for Err Name Not Resolved error. Try all the methods one by one until you get the issue resolved.
How to Fix ‘err_name_not_resolved’ in Windows:
As I said above, this problem can arrive for various reasons; there has to be more than one solution in order to fix the problem.
Since most of the common people don’t get into the reasons for originating the problem, all the below methods need to be given a shot one by one. Let’s find out what solutions need to be applied in order to resolve this issue.
#Solution 1.
The first workaround for this problem is to change the DNS server address. If you know how to do it, go ahead and change it without giving a read to this section. And if you don’t know how to change the DNS server address, follow the below steps.
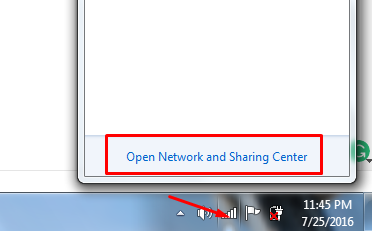
Step 1. To change the DNS address, Go to the control panel and then choose Network and Sharing Center. You can directly go to that page by clicking the small internet icon in the bottom left corner of your computer and then go to Open Network and Sharing Center.
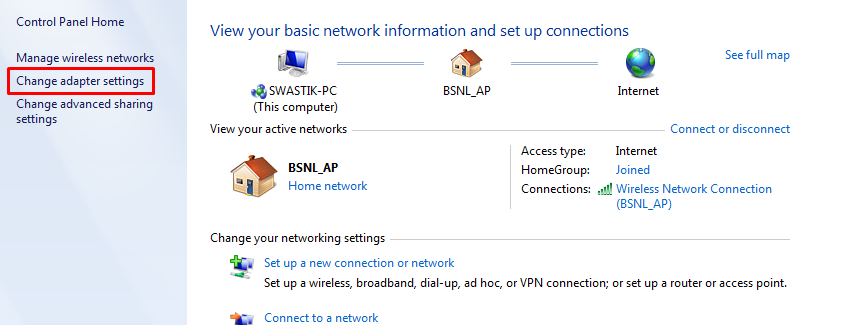
Step 2. On the Network and Sharing page, click on the Change Adapter Settings from the left panel. If you can’t locate the option, have a look at the below screenshot.
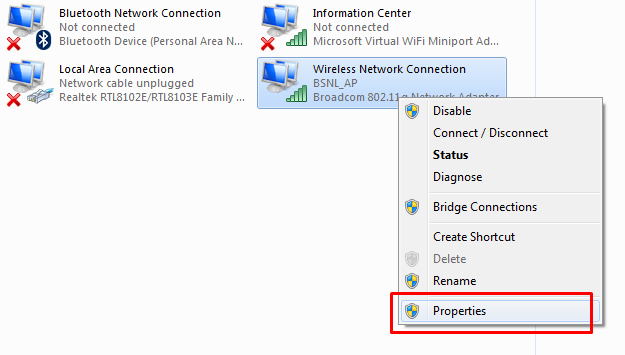
Step 3. Now right-click on your active network connection and go to Properties. Have a look at the below screenshot.
Step 4. In the Properties window, scroll all the way down to Internet Protocol Version 4 (TCP/IPv4) and double-click it, or click on properties. On doing that, the following window will appear.
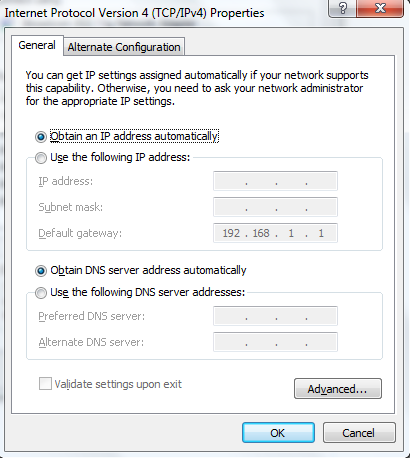
Step 5. Now select Use the following DNS server addresses and write your desired DNS servers and confirm the changes by clicking Ok. In my case, I have used the following server, see the image below.
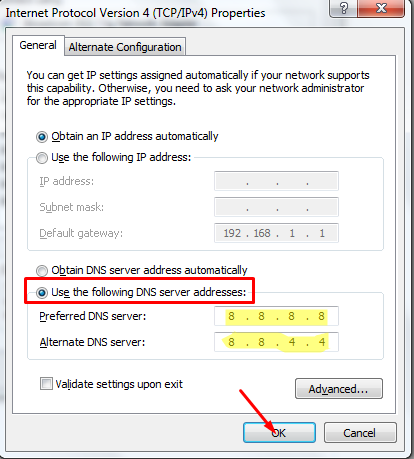
Step 6. As sooner you click ok, the changes would be confirmed, and you are done.
#Solution 2.
If the above method doesn’t work for you, here goes the second solution. Just Flush or renew your DNS address. Here are the steps you need to follow in order to change the Flush/renew DNS address.
Step 1. Click on the start menu, and write CMD in the search bar. Now right click on the search result at the top i.e CMD under Programs and select Run as administrator. The entire process is shown in the screenshot below.

Step 2. As sooner you do as directed above, the command prompt will be launched in the administrator mode. Now we need to write here some commands in order to flush and renew the Ip address.
The command you need to run is ipconfig /flushdns. So write this command in the command prompt and press enter. See the below screen to understand how to do it.

Step 3. On doing that, the DNS server address would be flush out, and you now need to renew it. So write ipconfig /renew in the command prompt and press enter.
Step 4. Once done, register new DNS by running the command ipconfig /registerdns . Type this command in the command prompt and press enter.
With that, you are done. Now check if your internet is working properly. If everything is good, no need to try the next method. And if there is still showing the same error, try out the next solution.
#Solution 3.
If the above methods don’t work for you, try out the third method i.e. removing all the browser cookies, cache, and other stuff maybe they are causing the problem, we never know after all. So follow the below steps and do as directed.
Depending upon the browser you use, deleting the cache, cookies, browser data might be different to do in your browser. The below steps are dedicated to Chrome users. Here’s how to do that.
Step 1. First of all, open the browser on your computer and click on the browser menu i.e., three horizontal lines at the top right corner. On clicking the Chrome menu, a drop-down list of all the options will get open up, select Settings out of them.
Step 2. On the settings page, scroll down to the bottom and click on the Show Advanced Settings link.
Step 3. Clicking on show advanced settings, you will get to see more options. Now click on the Clear Browsing data button under Privacy. Have a look at the below screenshot.
Step 4. On doing that, a clear browsing data pop-up window will appear. Now check the boxes next to the Browsing History, Download History, Cookies and other site and plug-in data, and Cached images and files.
To understand better, see the screenshot below.
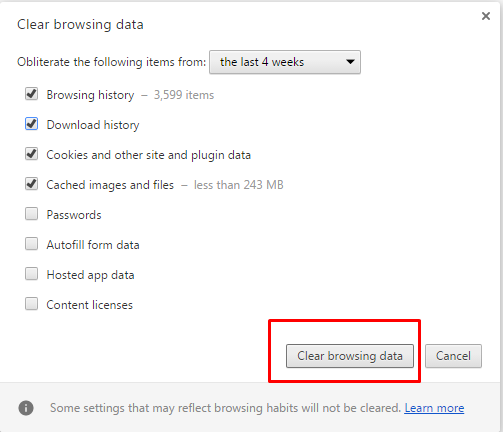
Step 5. Once all the changes are done, click on the Clear Browsing Data button at the bottom, and all the cookies, browsing data, and all would be deleted.
I guess, by now you must have resolved the err_name_not_resolved error from your browser and surfing the internet seamlessly. If the problem persists, you might need to call your ISP(Internet service provider). They might resolve this problem for you!
If the tutorial helped you resolve the error, show your courtesy by sharing this guide with others, so that everyone can get benefits from this guide.
Quick Links
