Do you want to know how to transfer files between two PCs using a LAN cable in your home or office? Then, you have just landed in the right place.
I know how it feels when you have to plug constantly in and out external hard disks and pen drives for the data transferring. It is way too clumsier, isn’t it? That’s why I have come up with a tutorial on how to transfer data between two PC or Laptops using a LAN cable.
Are you ready to dig deep into the meat of this post? Here you go!
Transfer Data between Two PC/Laptops using LAN Cable
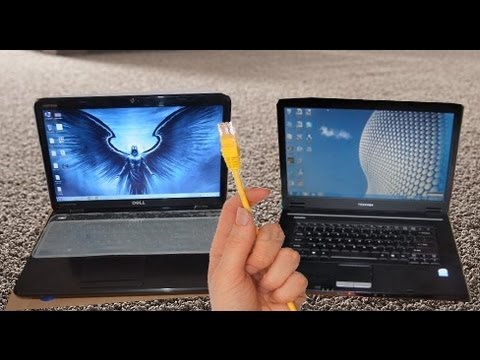
You need to be patient enough for setting up a LAN connection for the first time. Once the setup is done, you can transfer files between two machines without sweating much.
Before going to the configuration process of LAN, I would like to invite your attention to the advantages of the same.
Benefits of LAN
- You don’t need any expensive extra equipment other than an Ethernet cable worth only $5.
- In portable data transferring devices, you have to plug it into a computer and copy files, then paste it to the second machine. But here in the case of LAN cable, you need the initial setup only. The file transfer is a one-time process.
- Considering other data transferring modes, LAN is the cheapest one.
Prerequisites for the LAN Setup
You need the following things in order to send files from one computer to another using a LAN cable.
- A little bit of patience to get the initial setup done.
- Two laptops or PC (it’s essential, you know?)
- A LAN cable (you can buy one for only $5 from a local vendor or online marketplace)
With that being said, we can check out how to share files between two Windows PC.
How to Connect Two Computers via LAN and Send Files through it?
I have divided the entire process into several steps so that you can comprehend every action that needs to be taken for sending files between two PC or laptops using LAN.
Follow the steps given below to complete the setup.
Step 1: Take your LAN cable and connect both the ends into the proper network ports of either your computers or laptops. (You connect between a PC and a laptop as well). If your computer is an old one, you should buy a crossover cable instead of Ethernet.
Though both the cables have the same function, old computers lack support for LAN cables.
Step 2: Then, you must ensure that both the computers are connected to the same network and workgroup.
The first thing you need to do for that is to press the Win key and start searching for Control Panel. Just open the same.
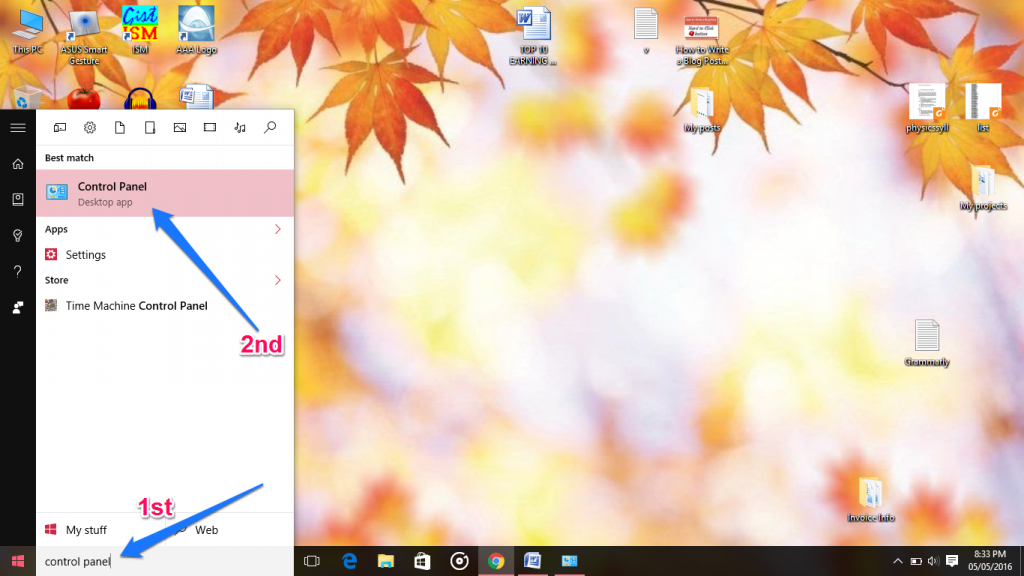
Step 3: You will be able to see a bunch of options there on the control panel. Don’t click on anything as you need to search for ‘System’ there.

Don’t forget to click the header at this step.
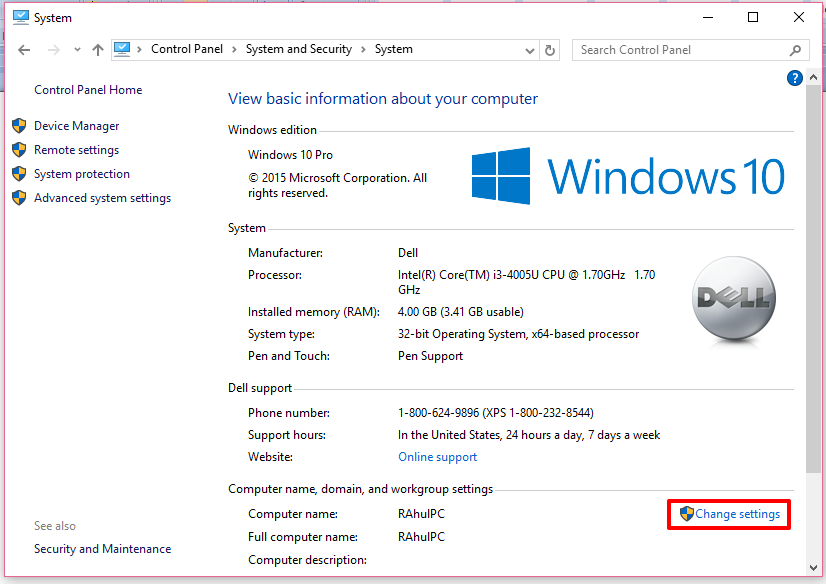
Step 4: Now, you can see the details of your computer like OS, processor, RAM capacity, system architecture, etc. (This is the same screen you get after following Right-click on My Computer or This PC>> Properties).
Click on the Change setting that lies on the right- bottom portion of the screen.
Step 5: You get another dialogue box here with about five tabs. Don’t switch on to another tab as we have got what we want on the first tab itself.
Just send your eyes to the bottom and click on the Change button.
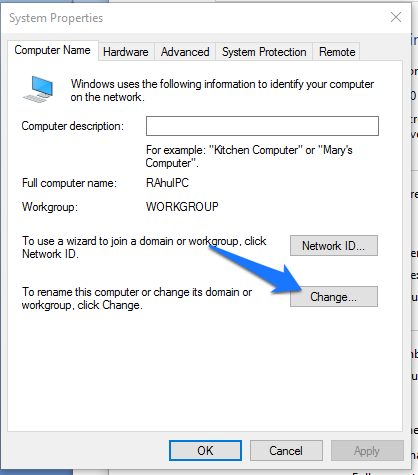
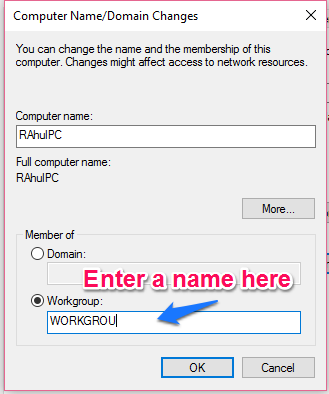
Step 6: Here, you can see a field just below the Workgroup label. Just enter any name there and then, repeat the same process on the second PC. Don’t forget to put the same workgroup name there as well. Click OK and then Apply.
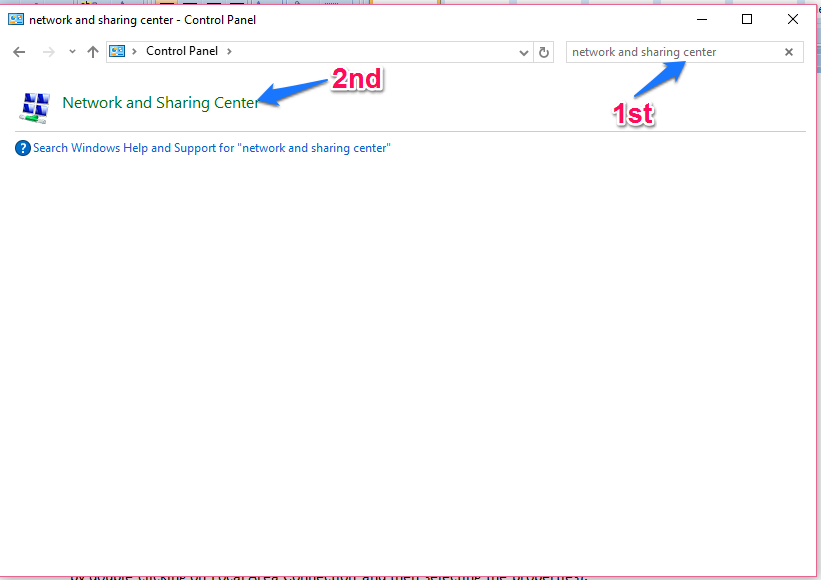
Step 7: Go back to the Control Panel now. In the search field, you should enter ‘Network and Sharing Center. Choose the first item that comes out.
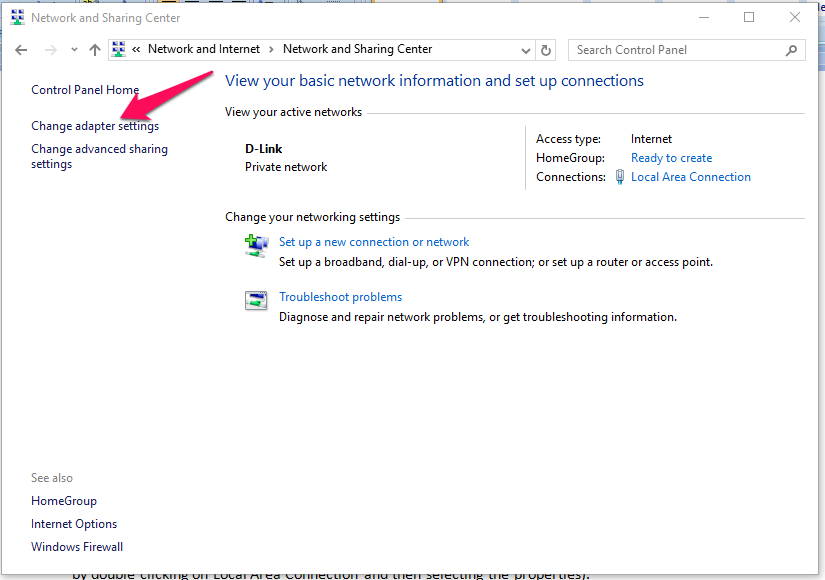
Step 8: You will get a new window here with your current connection information. On the left panel, three options can be seen. You need to click on the second one that says ‘Change adapter settings.’
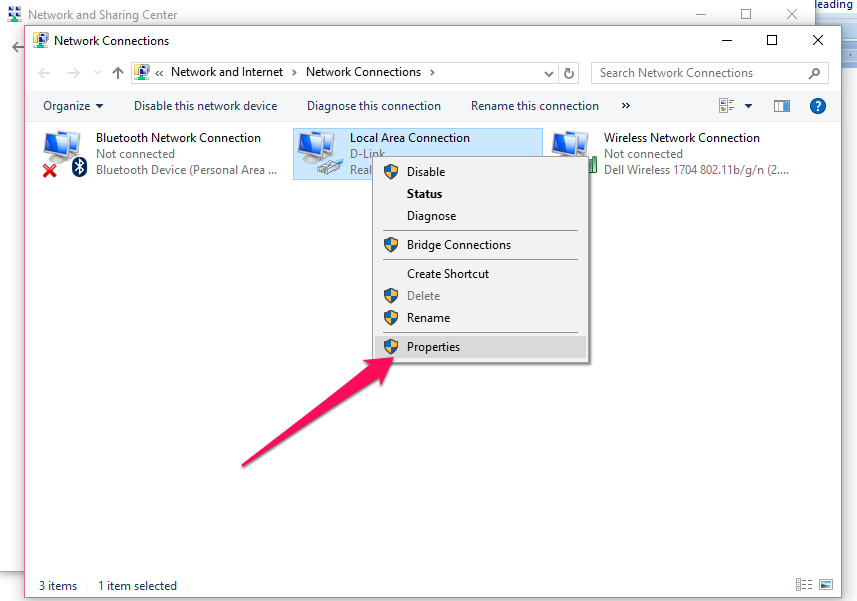
Step 9: Network Connections window will be what you see at this stage. You can clearly spot a Local Area Connection icon there. Right-click on the same and click Properties. (The same action can also be done by double-clicking on Local Area Connection and then selecting the properties).
Step 10: In the field right at the middle of the dialogue box, you can find ‘This connection uses the following item’s label.’ Look down for ‘Internet Protocol (TCP/IPv4)’. Then, just double click on the same or choose Properties (given at the right- bottom part) right away.
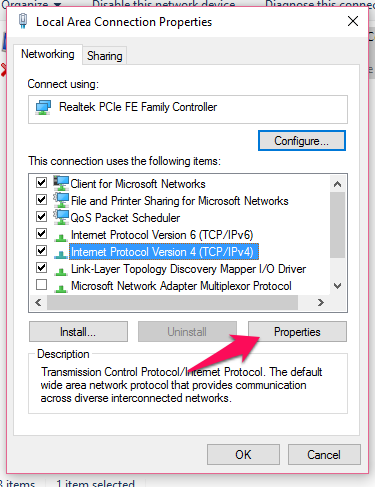
Step 11: The default option is ‘Obtain an IP address automatically. You need to change the same by clicking on the radio button left to ‘Use the following IP address.
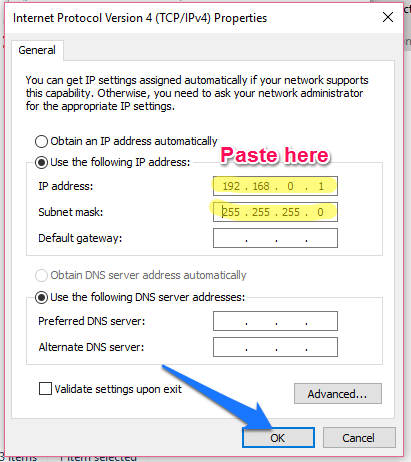
Step 12: After doing all the eleven steps given above, paste the following values to the appropriate fields.
- IP Address: 192.168.0.1
- Subnet Mask: 255.255.255.0
- Default Gateway: Leave it empty
Step 13: Click OK on both the boxes.
Repeat the twelve steps on the second PC as well. Don’t forget to enter the same workgroup name, IP address and subnet mask for you can’t share files between the machines if you opt for different values for these.
How to Transfer Data between two PC using LAN
Sharing data between two PC via LAN connection is a brainer. Just follow the steps given below.
Step 1: Right-click on the folder
Step 2: Go to Share this>> Specific people.
Step 3: Click on the drop-down menu, choose everyone, and hit Add. Then, select Share.
That’s all.
Wrapping Up:- How To Transfer Data Between Two PC Or Laptops Using A LAN Cable?
I hope you found this guide on quick and convenient file transfer via LAN useful. Don’t forget to use the comment section to let us know of your issues if any.
Consider sharing this post with your friends to help them get rid of the frustration of transferring data between two nearby computers using portable devices.
Have a beautiful day.
Quick Links
